


Search Site
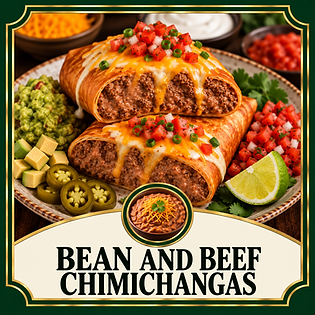
These Copycat El Monterey Beef and Bean Chimichangas are filled with seasoned ground beef and creamy refried beans, wrapped in flour tortillas, and cooked until crispy and golden. Inspired by the frozen El Monterey favorite, this homemade version delivers the familiar beef-and-bean flavor with an even better homemade taste.
Cook Time
Servings
Difficulty


25 minutes
8
Moderate
Prep Time

30 Minutes
Ingredients
Beef Filling
☐ 2 pounds lean ground beef
☐ 2 small onions, finely diced
☐ 4 cloves garlic, minced
☐ 2 teaspoons ground cumin
☐ 2 teaspoons chili powder
☐ Salt and black pepper, to taste
☐ 2 cups refried beans
☐ 2 cups shredded cheddar cheese
☐ 16 large flour tortillas
For the Creamy Lime Sauce
☐ 2 cups sour cream
☐ 4 tablespoons mayonnaise
☐ 4 tablespoons fresh lime juice
☐ 4 teaspoons ground cumin
☐ 2 teaspoons chili powder
☐ Salt and black pepper, to taste
Step 1: Prepare the Beef Filling
Heat a large skillet over medium-high heat. Add the ground beef and cook until it's browned and no longer pink, breaking it into small crumbles as it cooks. Drain any excess grease.
Add the diced onions and cook for 4 to 5 minutes, stirring occasionally, until softened. Stir in the minced garlic and cook for 30 seconds, just until fragrant.
Season the beef with the cumin, chili powder, salt, and black pepper. Stir well and cook for 1 minute to toast the spices and deepen their flavor.
Add the refried beans and stir until the mixture is smooth, creamy, and evenly combined. Remove the skillet from the heat and let the filling cool for about 5 minutes before assembling the chimichangas.
Step 2: Assemble the Chimichangas
Lay one flour tortilla on a clean work surface.
Spoon about ½ to ¾ cup of the beef and bean mixture into the center of the tortilla. Sprinkle with shredded cheddar cheese.
Fold the left and right sides of the tortilla over the filling. Fold the bottom edge up over the filling, then roll tightly into a burrito, keeping the filling completely enclosed. Place the chimichanga seam-side down. If needed, secure it with a toothpick to keep it from unrolling.
Repeat with the remaining tortillas.
Step 3: Make the Creamy Lime Sauce
While the filling cools, prepare the sauce.
In a medium bowl, whisk together the sour cream, mayonnaise, fresh lime juice, ground cumin, chili powder, salt, and black pepper until smooth and creamy.
Cover and refrigerate until you're ready to serve.
Step 4: Fry the Chimichangas
Pour enough vegetable oil into a deep skillet or Dutch oven to reach about 2 inches deep. Heat the oil to 350°F.
Working in batches, carefully place 2 to 3 chimichangas into the hot oil, seam-side down first. Fry for 3 to 4 minutes per side, turning as needed, until they're evenly golden brown and perfectly crispy.
Transfer the cooked chimichangas to a wire rack or a paper towel-lined plate to drain while frying the remaining batches.
Step 5: Garnish and Serve
Arrange the hot chimichangas on a serving platter or individual plates.
Drizzle generously with the Creamy Lime Sauce, or serve the sauce on the side for dipping.
Finish with your favorite toppings, including:
-
Fresh pico de gallo
-
Chopped cilantro
-
Sliced green onions
-
Extra shredded cheddar cheese
-
Diced avocado
-
Jalapeño slices
-
Guacamole
-
Salsa
-
Fresh lime wedges
Serve immediately while the chimichangas are hot, crispy, and the cheese is perfectly melted.
RECIPE TIPS
-
Don't overfill the tortillas. Using a little less filling makes them much easier to roll and helps prevent them from opening while frying.
-
Let the filling cool slightly before rolling. A cooler filling makes the tortillas easier to handle and helps them stay tightly sealed.
-
Use a thermometer to keep the oil at 350°F. Oil that's too cool will make the chimichangas greasy, while oil that's too hot can burn the outside before the inside is fully heated.
-
Fry in small batches. This keeps the oil temperature steady and gives every chimichanga an evenly crisp, golden crust.
-
Shred your own cheddar cheese. Freshly shredded cheese melts much smoother than pre-shredded cheese and creates a richer, creamier filling.

Directions
-
Can I make these chimichangas ahead of time?
-
Yes! Assemble the chimichangas up to 24 hours in advance, cover them tightly, and refrigerate. Fry them just before serving for the crispiest results.
-
Can I bake these instead of frying?
-
Absolutely. Brush the chimichangas lightly with vegetable oil or melted butter and bake at 425°F for 20 to 25 minutes, flipping halfway through, until golden brown and crispy.
-
Can I use flour tortillas that are smaller or larger?
-
Yes. Burrito-size tortillas work best because they hold plenty of filling and are easier to roll without tearing.
-
Can I freeze the chimichangas?
-
Yes! Wrap each assembled or cooked chimichanga individually and freeze for up to 3 months. Thaw overnight in the refrigerator or reheat directly from frozen using the oven or air fryer.
-
What can I serve with Beef Chimichangas?
-
They're delicious with Mexican Rice, Refried Beans, Spanish Rice, tortilla chips and Salsa, Mexican street corn, a Garden Salad, or chips with queso and Guacamole.
Frequently Asked Questions


Ingredients
Optional Toppings
Fresh pico de gallo
Chopped cilantro
Sliced green onions
Shredded cheddar cheese
Diced avocado
Jalapeño slices
Fresh lime wedges
Guacamole
Salsa
For Frying
☐ Vegetable oil (enough for about 2 inches of oil in a deep skillet or Dutch oven)
You MIght Also Like


Stay Connected with ConniePerryRecipes
Love homemade recipes? Follow me for new recipes, cooking tips, and behind-the-scenes content!
Follow • Share • Enjoy!~


Copycat El Monterey Beef and Bean Chimichangas
RATE & SHARE YOUR EXPERIENCE
❤️ Have you made this recipe yet?
I'd love to hear how it turned out! Leave a comment below and tell me:
-
⭐ Did your family love it?
-
🍓 Did you make any changes?
-
💡 Do you have a tip to share with other readers?
Your comments help make ConniePerryRecipes even better for everyone!